
As an online store owner, the efficiency of your shipping process plays a crucial role in customer satisfaction. Magento 2 offers several shipping methods to streamline this aspect of your business. In this ultimate guide, we will delve into the various shipping options available in Magento 2, the top carriers for 2023, and how to configure them for maximum efficiency.
Understanding Magento 2 Shipping Options

Magento 2 offers a diverse range of shipping options to online store owners, making it easier to cater to various customers’ preferences. With features such as free shipping, flat rate shipping, and real-time carrier rates, businesses can customize their shipping offerings to balance costs and customer satisfaction.
Magento 2 supports the configuration of applicable countries for each method, potentially enabling store owners to offer different rates and fees based on the destination, along with calculating handling fees based on desired profit margins. Built-in module settings for minimum order requirements may be used to activate specific options like free shipping, encouraging users to spend more.
Users can also integrate their accounts with leading carriers like DHL for seamless rate calculation and management. It’s essential to understand these robust Magento 2 shipping options, as they contribute significantly to cost-effectiveness, customer experience, and overall e-commerce success.
Essentials of Magento 2 Shipping Methods
Essentials of Magento 2 Shipping Methods play a crucial role in the success of an e-commerce business, as they enable merchants to offer various shipping options tailored to their customers’ needs. Flat rate shipping and free shipping methods provide simple, cost-effective solutions that appeal to consumers. By configuring applicable countries and minimum order amounts, store owners can target specific markets and encourage higher spending.
Calculation of handling fees and shipping costs allows for accurate price estimations, ensuring transparency between the merchant and customer. Furthermore, integrating carriers such as DHL broadens the available shipping rates, resulting in a more comprehensive and competitive range of options. In the event of an error in shipping calculations or other issues, properly configured displayed error messages will guide customers towards rectifying the problem, maintaining a seamless user experience.
Overall, understanding and leveraging Magento 2 Shipping Methods significantly improves customer satisfaction and business operations for e-commerce endeavors.
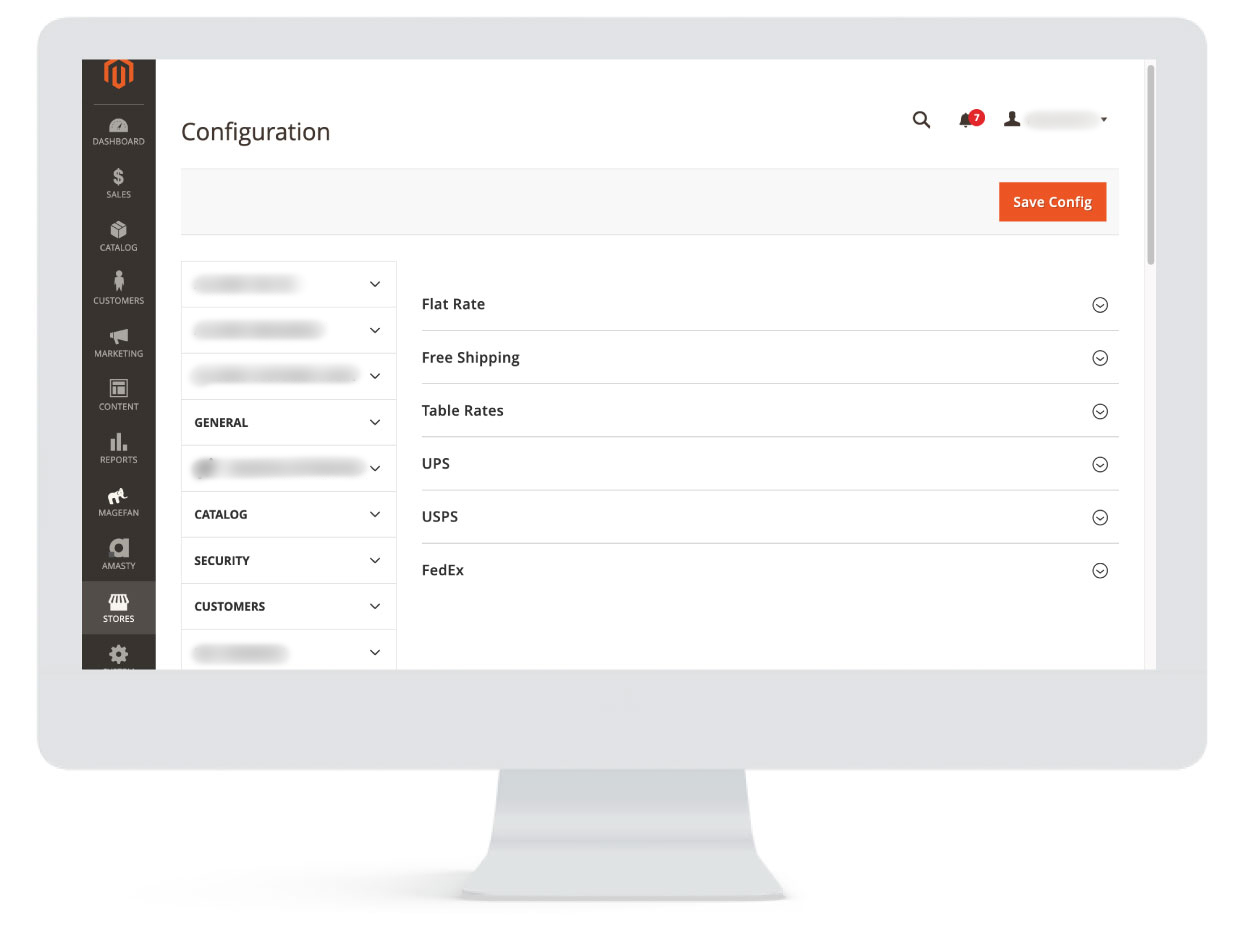
Configuring Shipping Settings
in Magento 2

Configuring shipping settings in Magento 2 is a crucial aspect of managing an e-commerce platform, as it directly influences customer satisfaction and overall user experience. The platform enables online store owners to customize various shipping methods, such as free shipping, flat rate shipping, and carrier-specific options like FedEx and UPS.
Additionally, the shipping methods in Magento 2 allows for the configuration of applicable countries for each method to target specific markets. Store owners can set minimum order amounts to qualify for free shipping or manipulate handling fees based on several calculation methods. Shipping rates can be either static or retrieved dynamically from the carriers’ systems.
Thoroughly understanding and executing these configurations not only streamlines the process but also helps businesses tailor their shipping strategies to cater to diverse customer preferences and effectively manage their cost factors.
Navigating Shipping Settings
Navigating shipping settings is crucial for businesses looking to optimize their e-commerce platforms, ensuring cost-effective and efficient delivery methods. Multiple shipping options, such as free shipping, flat rate shipping, and real-time carrier rates, cater to different customer preferences and order requirements.
To enhance international sales, businesses should configure applicable countries for each shipping method and consider weight constraints, package size restrictions, and minimum order thresholds. Accurate price calculation, which takes into account handling fees and fluctuating courier rates from providers like FedEx, UPS, USPS, and DHL adds transparency and trust to the customer experience.
The adequate configuration of these settings avoids displaying error messages and contributes to successful transactions while meeting customer expectations.
Making Use of Magento 2's Default Settings for Streamlined Shipping Configuration
In order to streamline the process of configuring shipping options for your online store, Magento 2 offers several pre-configured default settings. These default settings can prove to be extremely helpful for beginners who are just starting out with configuring their shipping options. It is highly recommended to first experiment with these default settings before moving on to more advanced customizations.
Magento 2’s default settings provide the option to configure various shipping settings, such as shipping origin, shipping methods, and shipping rates. By utilizing these pre-configured settings, you can save time and effort in setting up your store’s shipping options. However, it is important to note that while the default settings can simplify the process, they may not be suitable for all businesses. Therefore, it is always a good idea to thoroughly evaluate the default settings before making any final decisions.
Here is how you can do that:
Enabling Flat-Rate Shipping Method with Ease on Your Magento Website
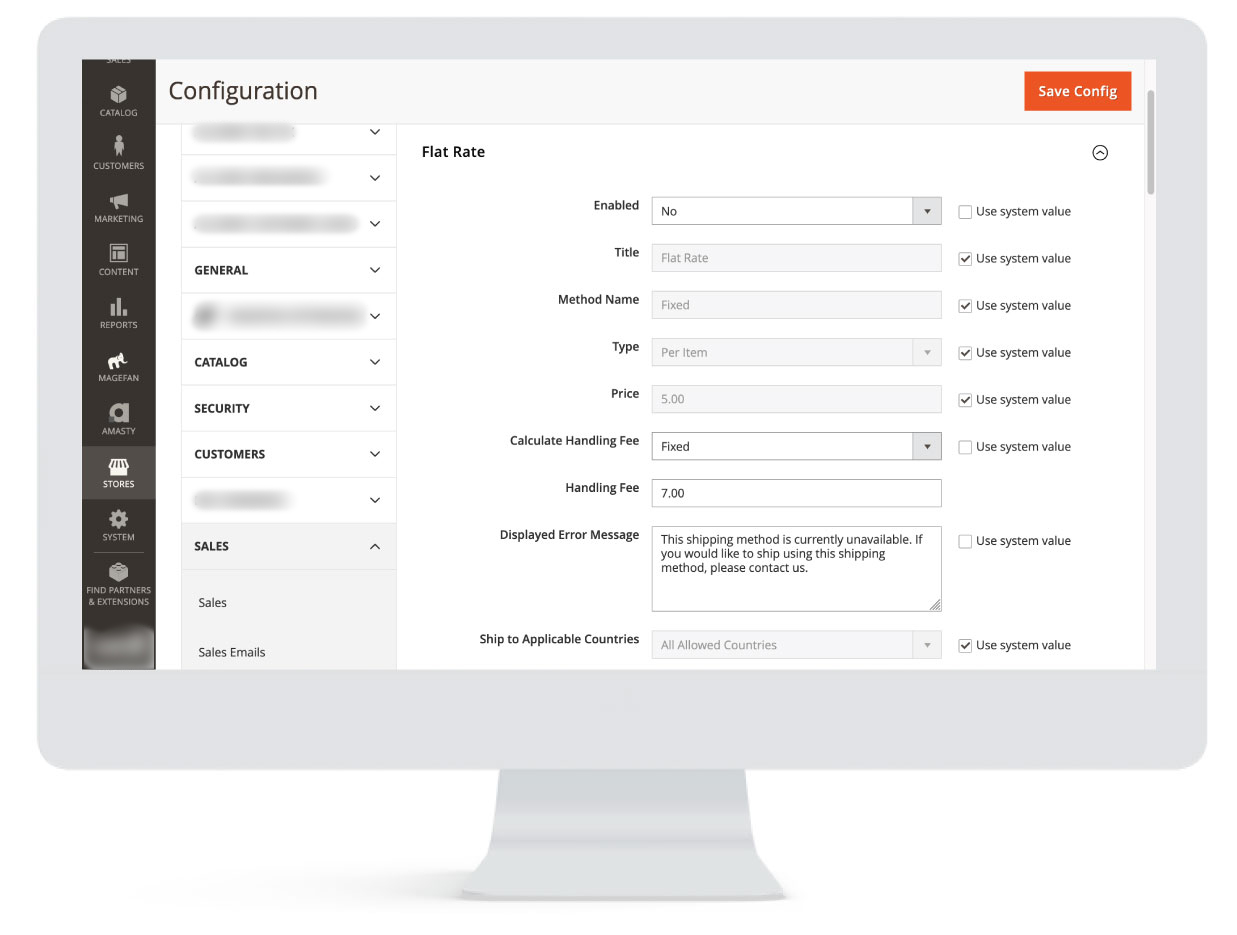
It’s important to have a variety of shipping options available to your customers, and the flat-rate shipping method is one of the most popular options. This shipping method offers customers a fixed fee regardless of the order size or weight, which can be very convenient and affordable for them. Enabling this shipping method on your Magento website is a straightforward process and can be done easily with a few simple steps.
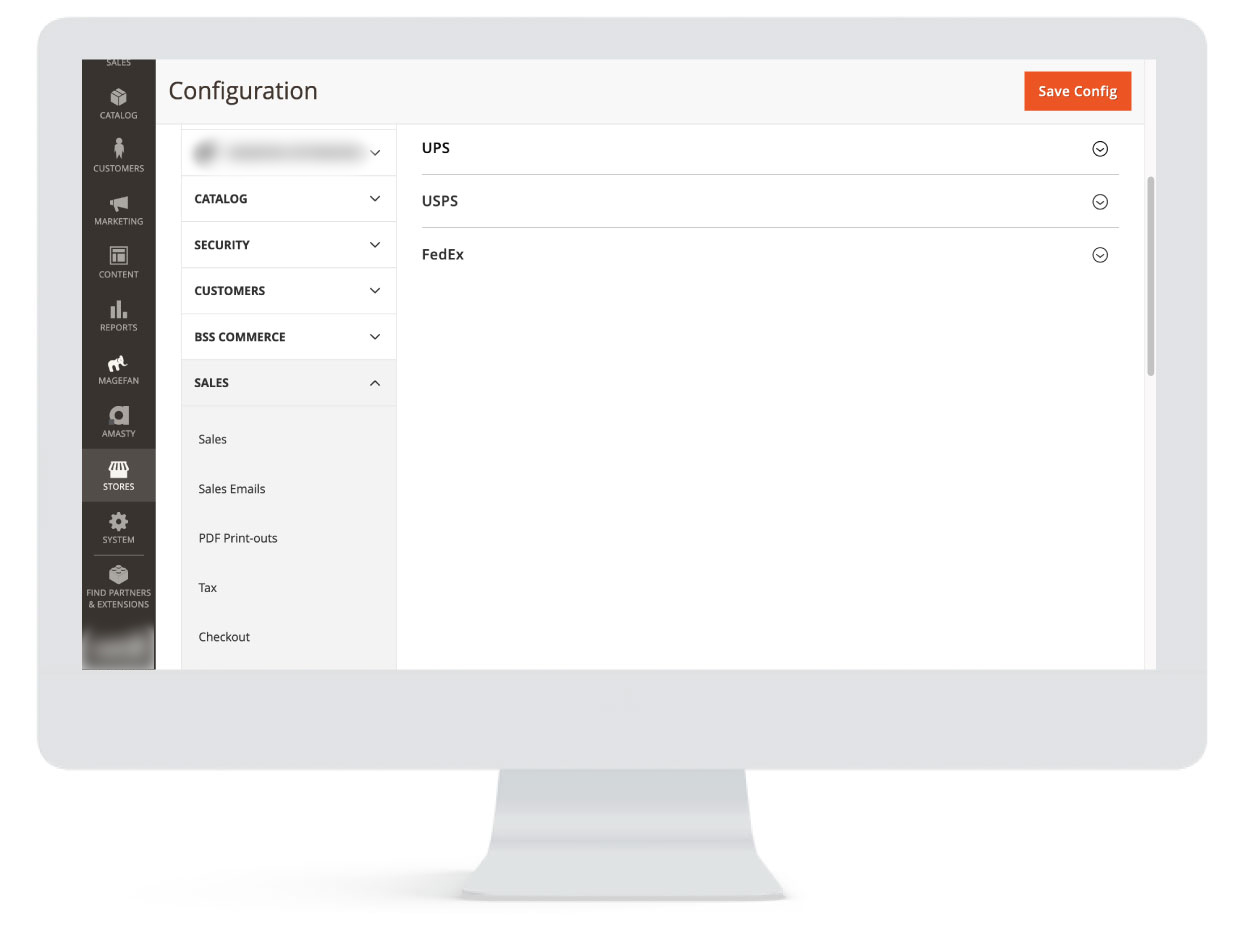
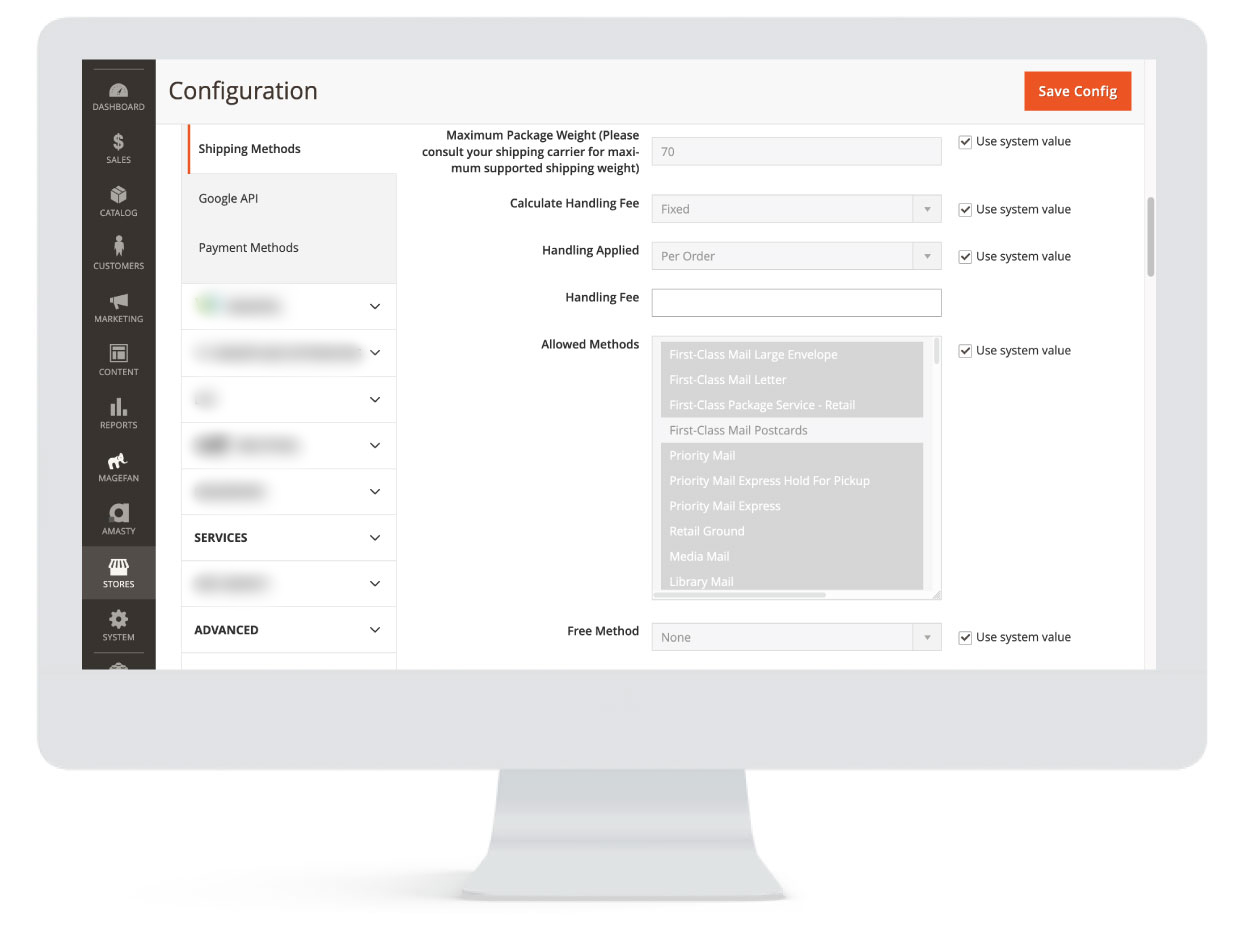
To enable flat-rate shipping on your Magento website, simply navigate to the “Stores” tab on your admin panel and select “Configuration.” From there, select “Sales” and then “Shipping Methods.” Here, you can easily enable the flat-rate shipping method and configure the pricing and other settings to suit your business needs. Once you have made the necessary changes, click “Save Config” to apply the changes to your website.
It’s worth noting that while enabling the flat-rate shipping method is easy, it’s important to set the right pricing and shipping options to ensure a positive customer experience. You should also consider offering other shipping options alongside the flat-rate or free method, to provide your customers with more flexibility and choice.
To enable the flat-rate shipping method in Magento, you can follow these steps:
- Log in to your Magento account and navigate to the Shipping Methods section.
- Select ‘Enabled’ next to Flat Rate.
- Set the Flat Rate Price and Title.
- Save your changes.
Once you’ve enabled the flat-rate shipping method, customers will be able to see it as an option during the checkout process. You can even customize the title of the shipping method to make it more appealing to your target audience. For example, you could call it “Standard Shipping” or “Affordable Shipping” to emphasize the flat-rate shipping fee.
In addition to offering flat-rate shipping, there are other shipping options you can provide on your Magento e-commerce store. These may include free shipping, expedited shipping, and international shipping. Offering a variety of options will enable you to cater to the unique needs of your customers and increase their satisfaction with their shopping experience on your website.
Improving Customer Experience by Customizing Error Messages for Display on Your Store Configuration

In the world of e-commerce, customer experience is everything. When a customer encounters an issue with their selected shipping method, it’s important to provide a helpful and informative error message to guide them toward a solution. Customizing your store’s error messages can improve the overall customer experience and increase customer satisfaction.
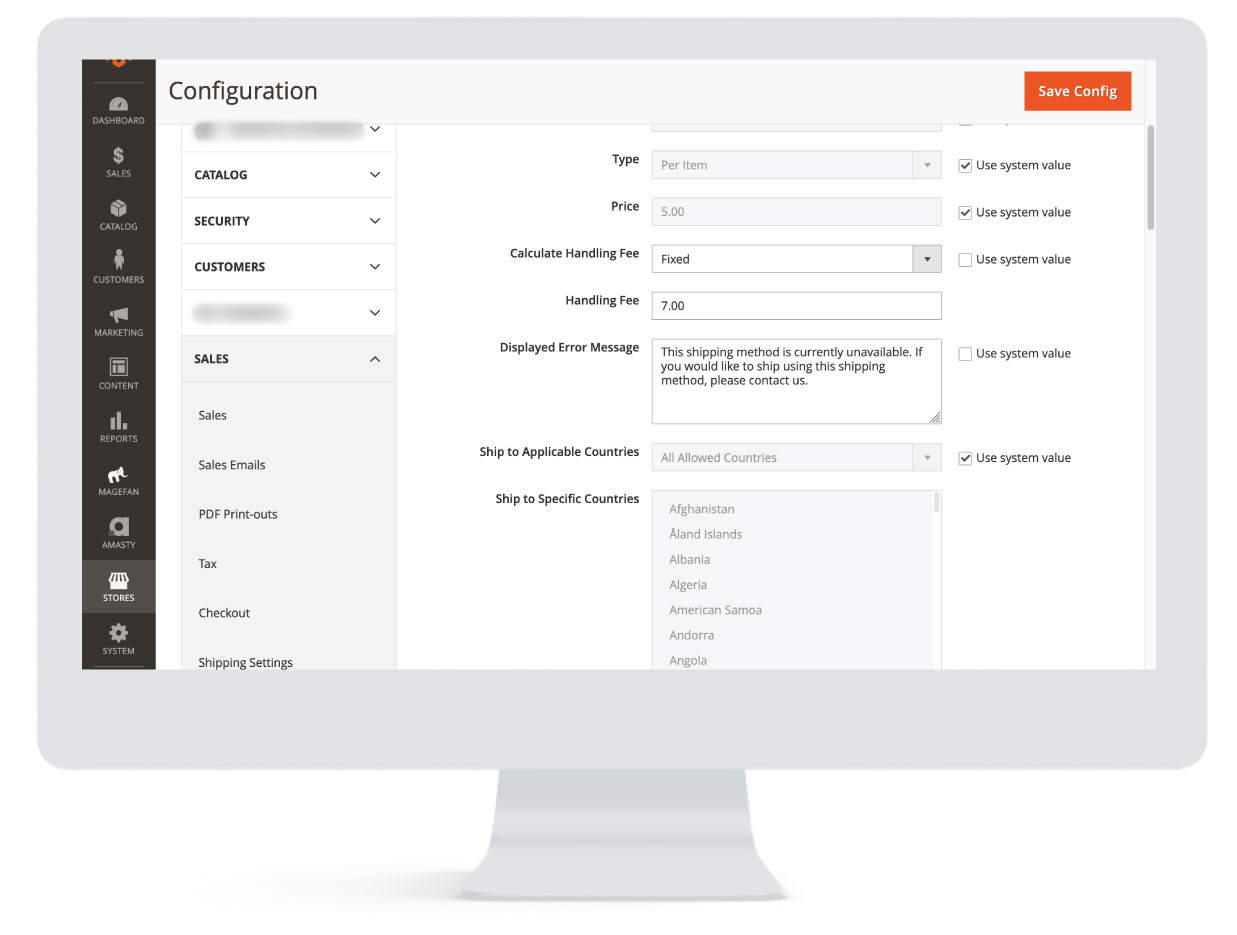
To customize the error messages displayed on your store, you can adjust the “Displayed Error Message” input in the configuration of the desired shipping method. By doing so, you can ensure that the error message is clear, concise, and informative, and provides customers with the necessary information to address the issue at hand.
However, it’s important to note that not all error messages are created equal. To truly optimize your error messages for display, it’s important to consider the specific needs of your customers and tailor the message accordingly. For example, if a customer encounters an issue with a shipping address, the error message should clearly state the reason for the issue and provide guidance on how to correct it.
It’s also important to make the error resolution process as easy as possible for customers. This can be achieved by providing links to relevant support documentation or contact information for customer support in the error message.
Free Shipping Options in Magento 2 Shipping Methods
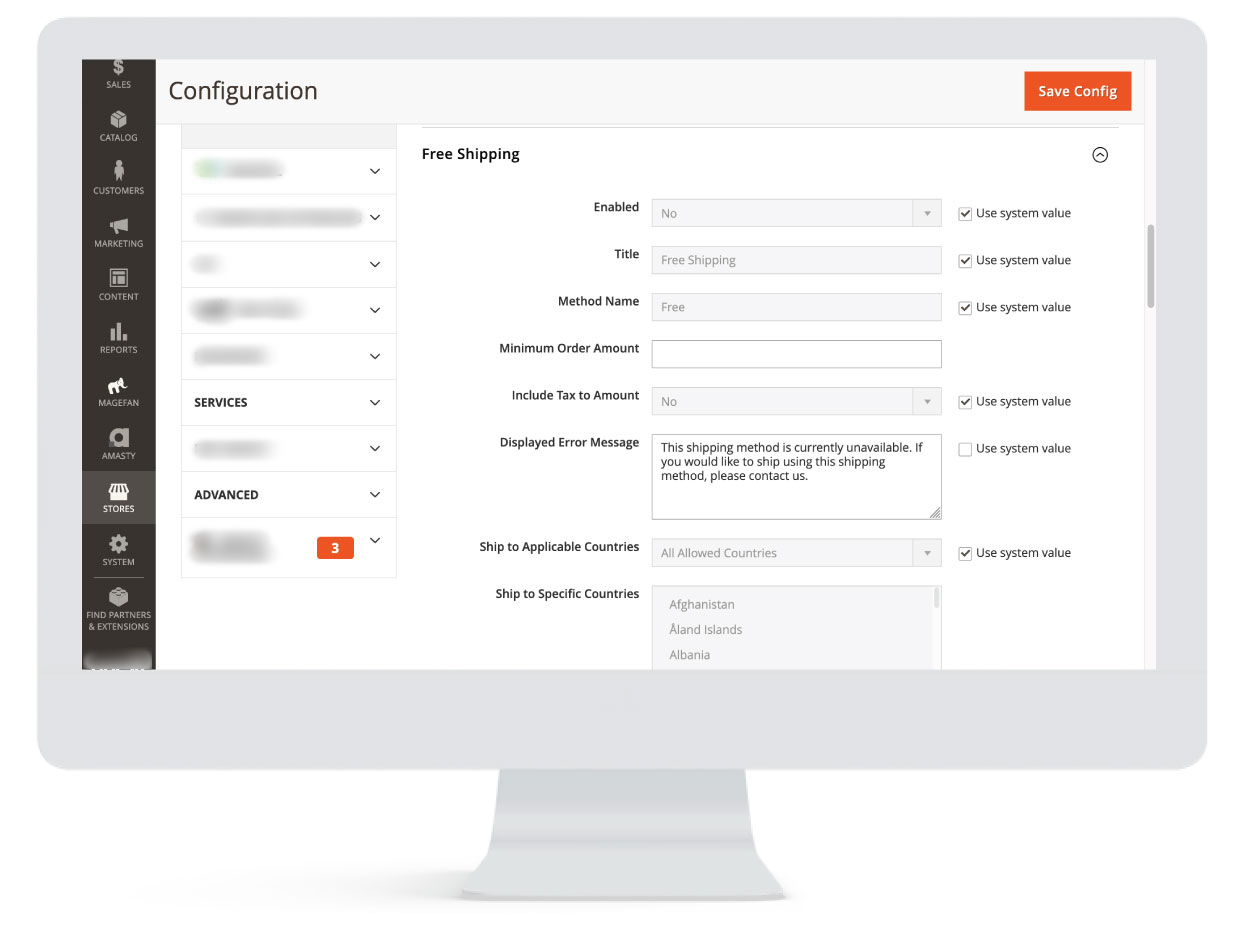
Free shipping is a powerful marketing tool that can help increase sales and customer loyalty on your e-commerce store. By offering free shipping, you can incentivize customers to spend more and make their shopping experience more enjoyable. Fortunately, enabling free shipping options in Magento 2 is a simple process that can have a big impact on your bottom line.
To enable free shipping on your Magento 2 store, you can adjust the “Free Shipping” method settings and set a minimum order amount threshold. This means that customers who meet the minimum order amount will be eligible for free shipping at checkout. You can also set a shipping rate to be applied to orders under the minimum order or free shipping amount threshold, which can help offset the cost of free shipping.
It’s important to note that the minimum order amount threshold for free shipping should be set based on your business goals and financial capabilities. Setting it too high may discourage customers from making a purchase, while setting it too low may not be financially viable for your business. You should also consider offering free shipping promotions during peak shopping seasons or for specific product categories to further incentivize customers.
Implementing Minimum Order Amount
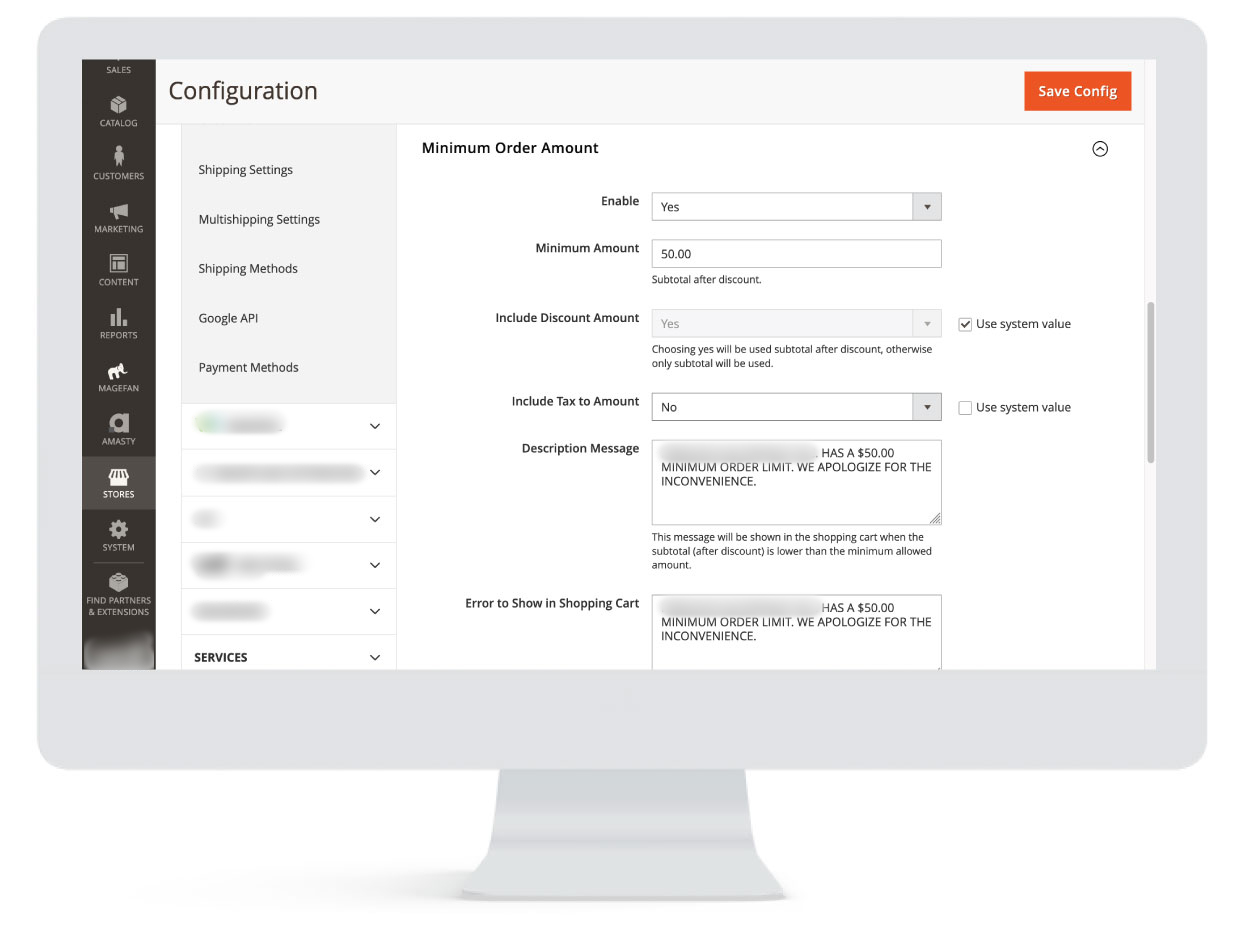
Providing free shipping can significantly enhance sales and customer satisfaction. Setting a threshold for a minimum order amount is a way to ensure that customers qualify for free shipping. This can have the added benefit of boosting the average order value and enhancing customer loyalty. Customizing the ‘Minimum Order Amount’ setting is a straightforward process that can be accomplished through the specific shipping method’s configuration.
It’s essential to note that the minimum order amount should be set based on your profit margins, shipping costs, and product value. Offering free shipping for high-ticket items is an excellent way to entice customers to purchase them. During peak shopping periods, you can also provide free shipping promotions to encourage larger purchases.
To improve sales and customer satisfaction, it’s important to experiment with various minimum order amounts and promotional strategies. It’s critical to regularly monitor and evaluate the impact of your free shipping options on customer behavior and sales to ensure that they align with your business objectives.
Top Shipping Carriers in Magento 2 for 2023
As an online store owner, you need to ensure that your customers receive their orders quickly and efficiently. To achieve this, integrating leading shipping carriers like UPS, USPS, FedEx, and DHL into your Magento 2 store can be a game-changer. These carriers are well-established in the market and have proven their reliability and efficiency over the years.
Thankfully, integrating these shipping carriers into your Magento 2 store is a straightforward process. You can do this by configuring the carrier-specific settings in your store’s shipping options. To start, simply select the desired carrier from the ‘Shipping Carrier’ dropdown in your Magento 2 store’s settings. This will give you access to the carrier-specific settings that you can customize to suit your business needs.
By integrating these carriers into your Magento 2 store, you can provide your customers with accurate shipping rates and tracking information, making the shipping process simple and efficient. This can help improve customer satisfaction and drive sales for your business. So, if you’re looking to streamline your shipping process, integrating these shipping carriers into your Magento 2 store is definitely worth considering.
Adjusting Carrier Configuration Settings

Each carrier has its unique configuration settings to fine-tune for optimized shipping operations. Let’s explore some common adjustments for major carriers like UPS, USPS, FedEx, and DHL.
Configuring UPS Applicable Countries
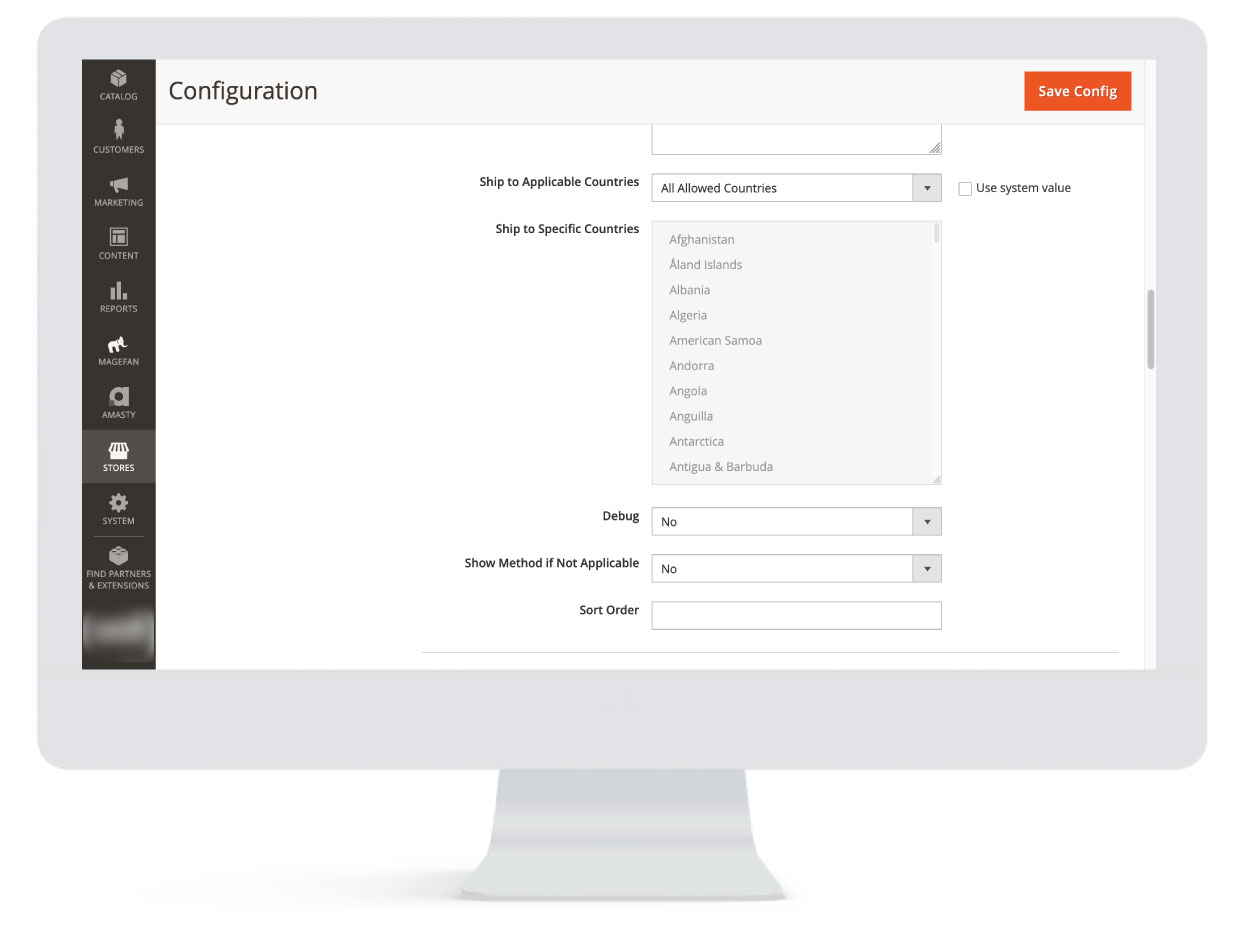
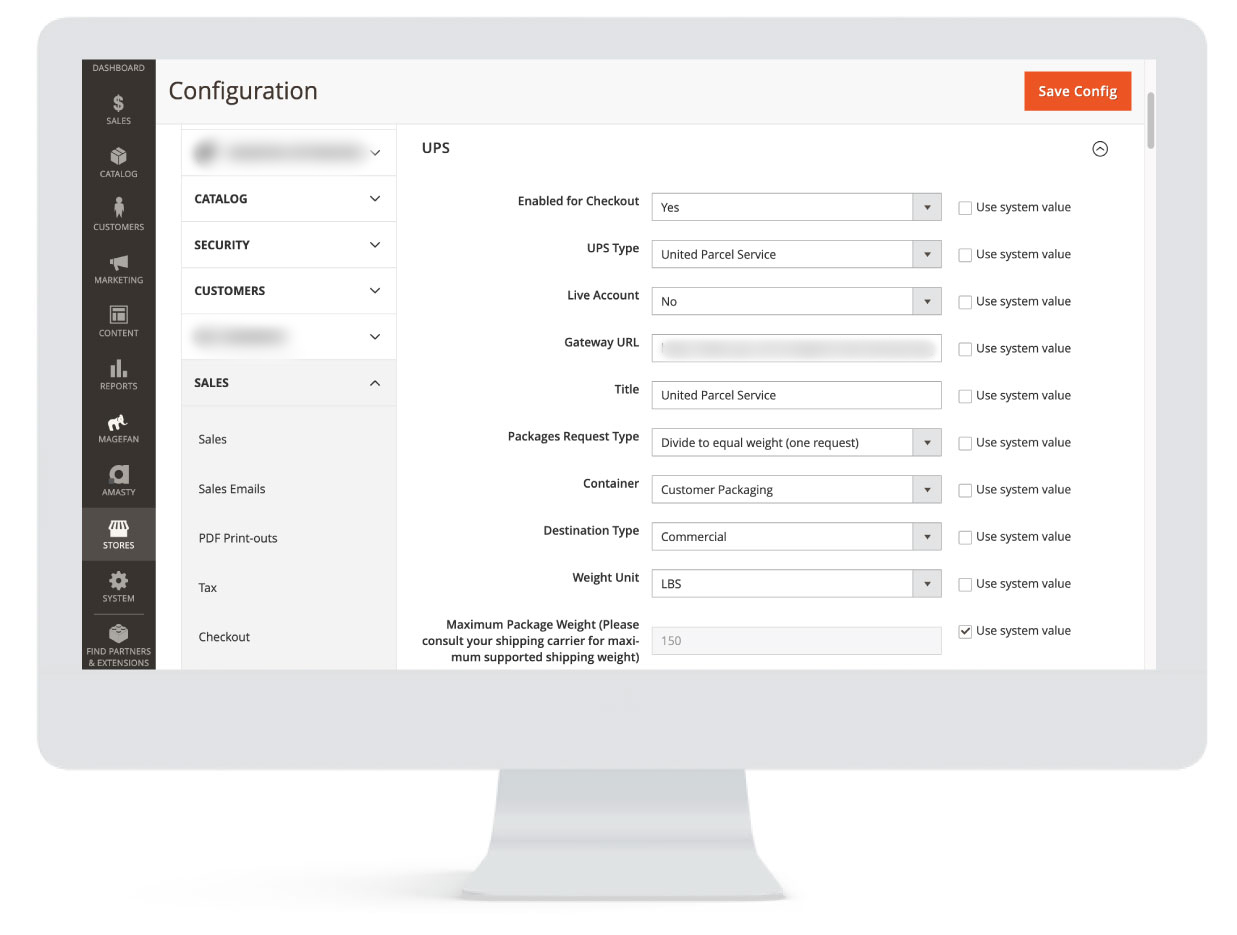
When setting up UPS as a shipping carrier for your Magento 2 store, it’s crucial to determine the countries where UPS will be available. This step will ensure that your customers have access to the most relevant shipping carrier according to their location.
To configure the applicable countries for UPS, navigate to the UPS configuration panel and adjust the ‘Ship to Applicable Countries’ setting. This process is simple and only requires a few clicks to complete. It’s important to consider the countries where you offer shipping and where UPS operates before configuring this setting.
This way, you can avoid offering UPS as a shipping option to customers in countries where it’s not available, or where the shipping costs are high. Properly configuring your UPS settings in Magento 2 will help ensure that your store is optimized for success when it comes to shipping products to customers.
Remember to regularly evaluate and update your shipping carrier settings to ensure the best possible customer experience.
Setting Up USPS Handling Fees
If you want to add a handling fee to USPS shipments, navigate to the USPS settings and input an appropriate value under ‘Calculate Handling Fee.’ This option allows you to charge a handling fee to your customers if you want to offset the costs of handling packages. This is an optional setting and you can choose whether or not to include it in your checkout process.
Remember to regularly evaluate and update your shipping carrier settings to ensure the best possible customer experience.
Optimizing FedEx Delivery Methods
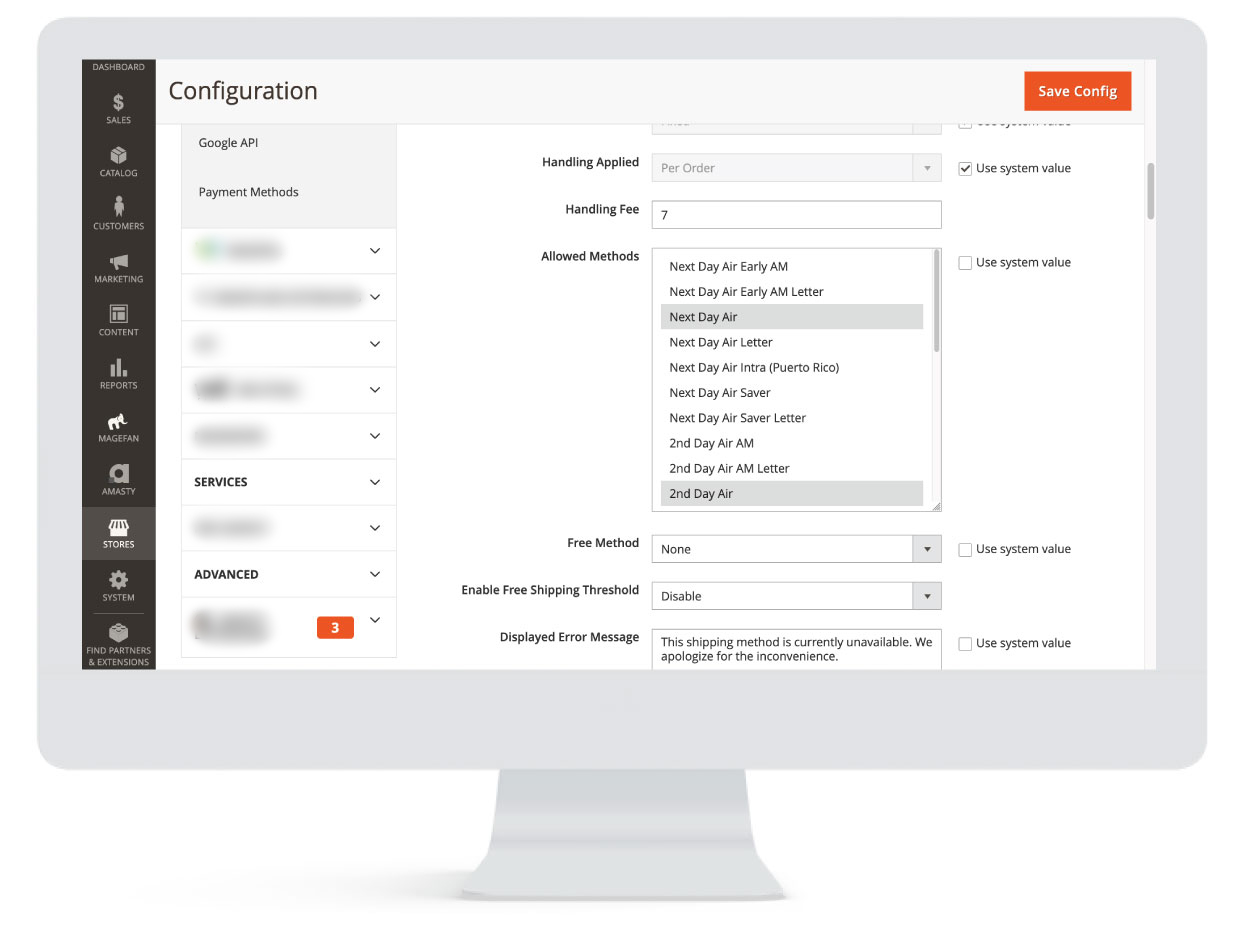
When setting up FedEx shipping options on your Magento 2 store, it’s crucial to optimize the delivery methods that are available to your customers. Customizing the available FedEx delivery methods allows you to offer tailored shipping options that meet your customers’ specific needs. To achieve this, navigate to the FedEx settings and select your preferred delivery methods from the ‘Allowed Methods’ dropdown.
This selection will determine the delivery options that customers can choose from during checkout. As you make your selections, keep your target audience in mind and consider their shipping preferences. For instance, if your customers are mainly located in urban areas, offering same-day or next-day delivery may be more appealing.
Alternatively, if you have customers located in different regions, you may want to provide a variety of delivery options that cater to different shipping distances. By analyzing customer behavior and experimenting with different delivery methods, you can optimize your FedEx shipping options to enhance customer satisfaction and increase sales.
Always remember to review and update your delivery options periodically to keep pace with changing customer needs and preferences.
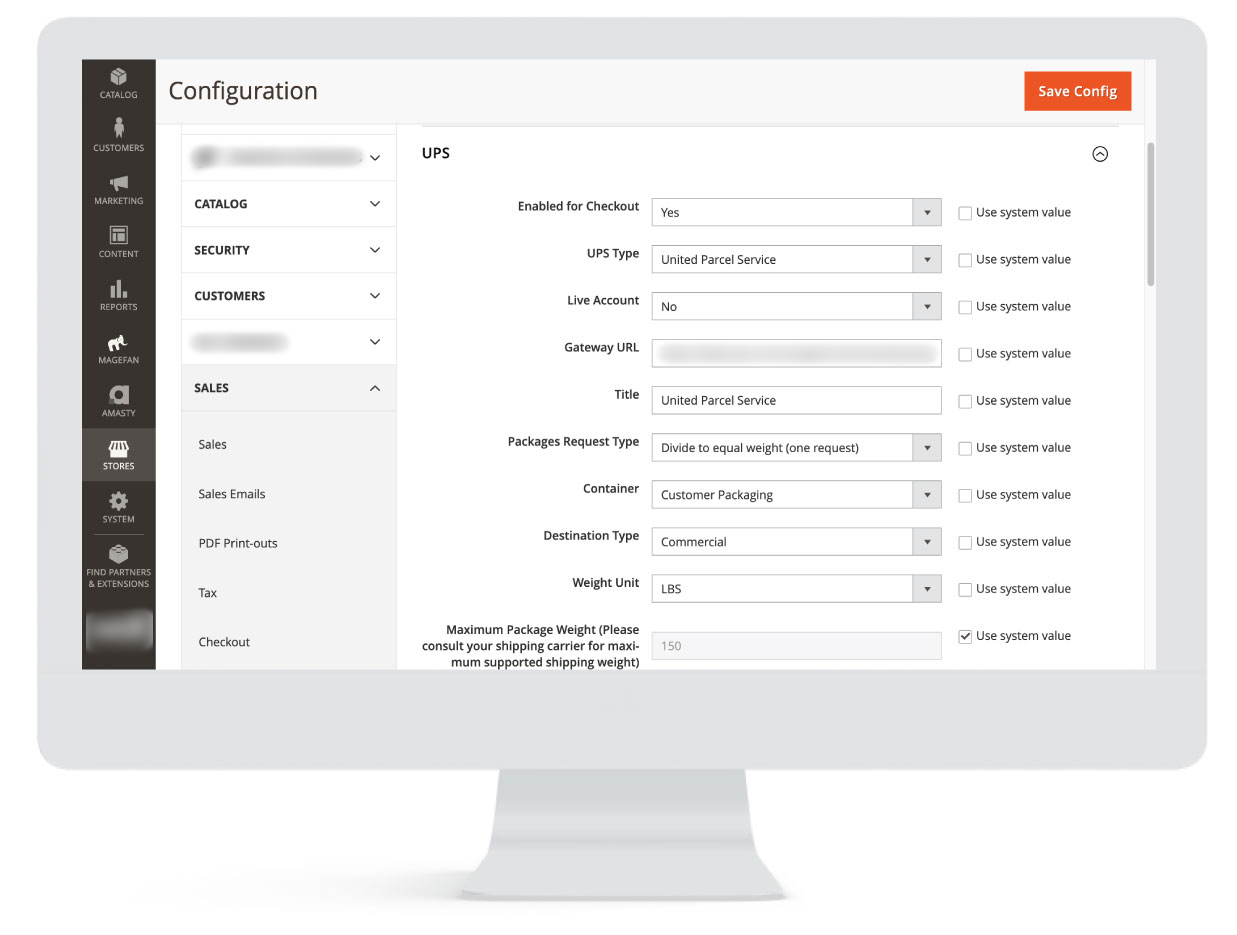
Establishing UPS XML Account
If you’re looking to use United Parcel Service (UPS) as a shipping carrier on your Magento 2 store, it’s crucial to establish a UPS XML account to ensure accurate shipping calculations. To do this, you’ll need to input your account details and enable the XML gateway service option within UPS settings.
By creating a UPS XML account, you’ll have access to the most up-to-date and accurate shipping information, including shipping rates, delivery times, and tracking information. This will enable you to provide your customers with accurate and reliable shipping information, which can help build trust and increase customer satisfaction.
It’s important to note that you’ll need to have an existing UPS account to create a UPS XML account. Once you have your UPS XML account set up, you’ll be able to streamline your shipping process and provide your customers with a seamless experience from start to finish.
Customizing UPS-Allowed Methods
To tailor your UPS shipping options to your customers’ preferences, you can select the specific UPS methods you wish to offer by customizing the ‘Allowed Methods’ dropdown in the United Parcel Service settings. This allows you to choose from a range of delivery methods, including Next Day Air, 2nd Day Air, and Ground, among others.
When deciding on the methods to offer, consider your target audience and their delivery needs. For instance, if your customers value speed and time, you may want to offer Next Day Air or 2nd Day Air, whereas Ground may be more suitable for customers who prioritize cost. By experimenting with different UPS methods and analyzing customer behavior, you can optimize your shipping options to maximize customer satisfaction and increase sales.
It’s worth noting that you should ensure that the methods you offer align with your business model and capabilities. Offering methods that you can’t fulfill or that incur significant costs could negatively impact your business.
Defining UPS Package Details
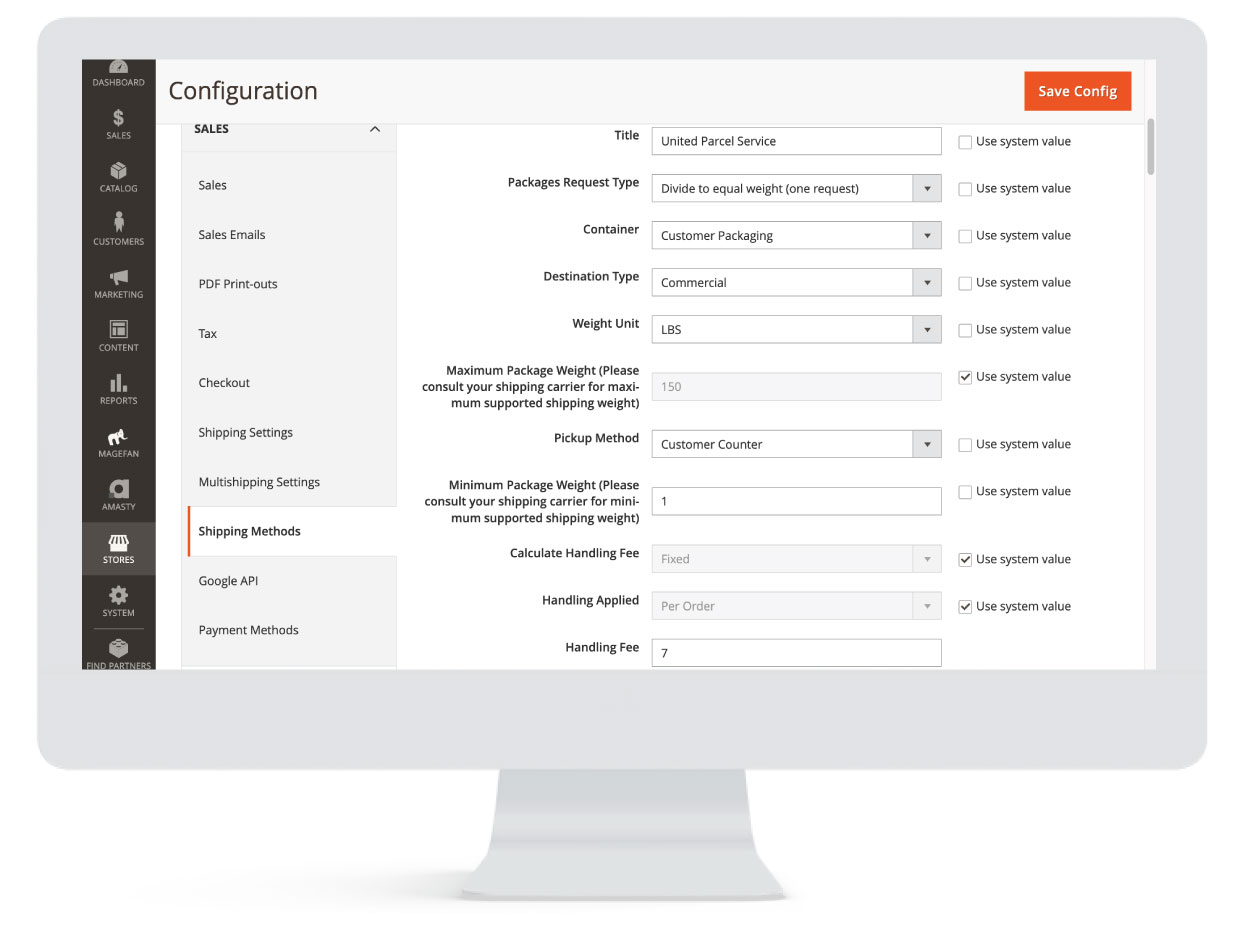
To ensure accurate shipping rate calculations for UPS, specific details must be provided within the UPS settings. One of the most crucial details is the maximum package weight and dimensions. This information is essential to ensure that the shipping rates calculated are based on the correct weight and size of the package.
It becomes even more important if a large volume of packages is being shipped, as inaccurate calculations can result in costly errors. Regularly reviewing and updating these settings is also essential, especially if new products with different shipping requirements are introduced.
Keeping the UPS settings up-to-date can provide customers with accurate and transparent shipping rates, which can improve customer satisfaction and reduce the likelihood of disputes.
Integrating Your DHL Account

Link your DHL account to your Magento 2 store to provide DHL shipping options to customers. This requires entering your DHL account information into the DHL settings panel.
The following are the required fields for your DHL shipper account access:
- DHL Account Number: Enter your unique account number provided by DHL.
- DHL Site ID: Specify the Site ID associated with your DHL account.
- DHL Password: Provide the password associated with your DHL account for authentication purposes.
- DHL Account Type: Select the appropriate account type, such as business or personal, based on your DHL account.
- DHL Account Country Code: Enter the country code associated with your DHL account.
Configuring DHL Methods, Applicable Countries, and More
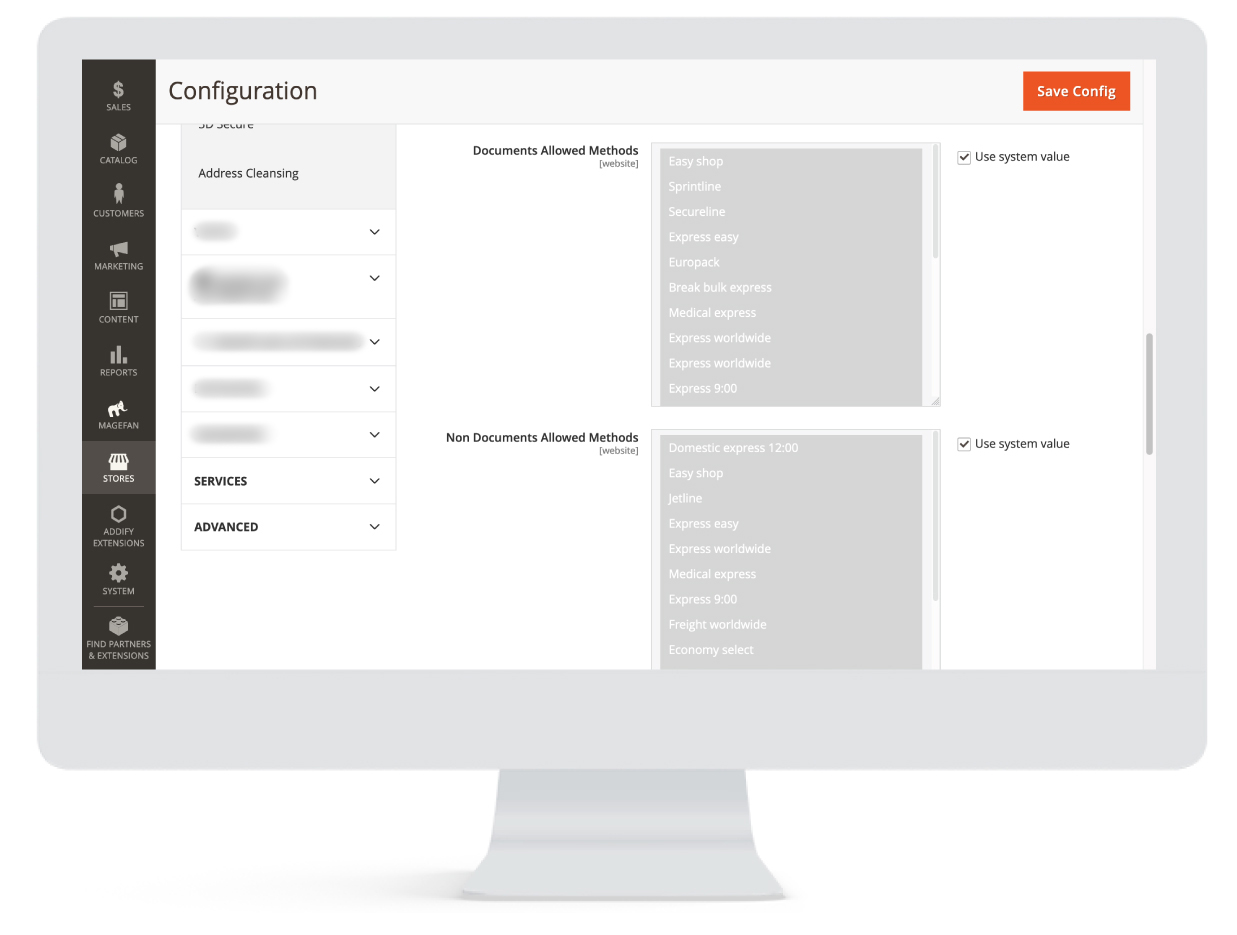
If you are using DHL as your preferred shipping carrier, it is important to configure your DHL shipping settings to best suit your business needs. To do this, you can customize your DHL shipping experience by modifying different settings, such as shipping methods, applicable countries, handling fees, and other related options.
The DHL configuration section allows you to choose which shipping methods are available to customers during checkout, based on your preferences and shipping requirements. You can also specify which countries are eligible for DHL shipping and set handling fees that cover any additional costs associated with shipping.
It’s important to consider your target market and their preferences when configuring your DHL settings. For instance, if you have customers primarily located in certain countries, you may want to limit your shipping options to only those from specific countries, to streamline the checkout process. Reviewing and adjusting your DHL configuration settings regularly can ensure you that your shipping options are up-to-date and optimized for your customers’ needs.
Exploring Additional Carriers

If you want to provide your customers with more shipping options, you can link additional carriers to your Magento 2 store. This will give your customers a wider range of shipping options to choose from, increasing the chances of them finding a shipping method that suits their needs. You can explore various carriers such as USPS, Canada Post, and others, depending on your target market and their preferences.
By adding more carriers, you can also improve your shipping strategy by taking advantage of each carrier’s unique strengths. For instance, you might offer USPS for domestic shipments and DHL for international orders.
This way you can optimize shipping rates and delivery times for different destinations. Overall, adding additional carriers can help you stand out from competitors by providing customers with more options and a better overall shopping experience.
Frequently Asked Questions
What Shipping Carriers Are Available in Magento 2 by Default?
Magento 2 offers several shipping carriers, including UPS, USPS, FedEx, and DHL. These carriers are pre-installed with the Magento 2 software and can be configured to offer a range of shipping methods, such as ground, air, express, and overnight shipping.
It’s important to note that while these carriers are available by default, they may not be enabled or visible to customers until they are configured and set up in the Magento 2 shipping settings.
How Do I Set Up Table Rates for Shipping in Magento 2?
To set up table rates for shipping in Magento 2, you’ll need to navigate to the shipping methods section of the Magento 2 admin panel and select the “Table Rates” option. From there, you’ll need to input the conditions that will determine the shipping rates, such as destination and weight ranges, and the corresponding costs for each condition. Once you’ve saved your table rate settings, Magento 2 will automatically calculate the appropriate shipping costs for each order based on the conditions you’ve set.
Can I Offer Flat Rate Shipping in Magento 2?
Yes, Magento 2 allows you to offer flat rate shipping to your customers. This is a popular and simple shipping method where you can set a fixed shipping cost regardless of the order’s weight or destination.
To offer flat rate shipping in Magento 2, you need to go to the admin panel and navigate to Stores > Configuration > Sales > Shipping Methods. Under the ‘Flat Rate’ shipping option, you can configure the shipping cost by specifying a title, a method name, and the cost you want to charge for the shipping method.
How Do I Configure the Shipping Methods Available to Customers in Magento 2?
In Magento 2, you can configure the shipping methods available to customers by going to the “Stores” tab in the Admin panel, selecting “Configuration,” and then selecting “Sales” and “Shipping Methods.” Here you can enable or disable various shipping methods and carriers such as UPS, FedEx, DHL, USPS, and more. You can also set the name and title of each shipping method, and define the shipping options and rates for each method. In addition, you can choose which countries and regions are eligible for each shipping method, and you can add handling fees or surcharges if necessary.